Detailed Technical Information
Introduction
In most of the information provided by Optical Hardware, you’ll find us advising that modest magnifications are best and that ‘exit pupil’ is very important in assessing how bright the image will appear to be. For most practical terms when choosing a binocular this is true however, as is often the case with scientific things, it isn’t the whole story. The laws and rules of optics can become quite mathematical and complicated, We’ll attempt here to outline some of the more detailed considerations when choosing an optical instrument without getting too technical.
First the basics
All binoculars, telescopes and monoculars ( a monocular is really just a small telescope ) are designed to produce magnification.
You will usually see a binocular or spotting scope described as an 8×30 or 10×50 or 20×80 etc. The first number refers to the magnification, so a 20×80 for example will make the image appear 20x larger than the object viewed unaided.
Higher magnification isn’t always better, because high magnifications usually mean a less stable image, lower fields of view and the image can appear duller ( Field of view is how much of the object you can actually see without moving the binocular or telescope and is discussed in more detail later ).
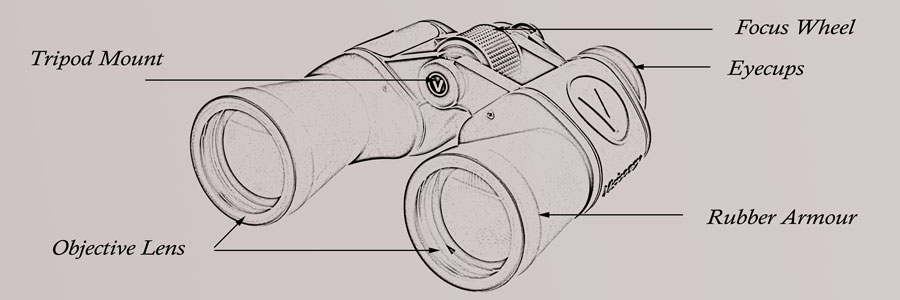
The second number refers to the size of the objective ( front ) lens, so on a 20×80 the objective lens(es) are 80mm wide. Bigger lenses can gather more light, so produce brighter images in low light, the downside is that bigger lenses means the binocular or scope will be bigger and heavier to carry.
Some instruments have “zoom” magnification, for example 20-60×70. This means that the instrument has variable magnification from 20x to 60x and the objective(s) are 70mm
The above applies to binoculars and spotting scopes. A spotting scope is a term used for most telescopes designed for normal observation. Telescopes designed for astronomy are often described slightly differently. You will usually find these types of instrument described by the “focal length” of the telescopes main tube and the size of the objective lens or primary mirror ( many astronomical telescopes use mirrors instead of lenses, more about that later ) So an astronomical telescope may be listed as a 1000mm / 114mm, meaning that the telescope has a focal length of 1000mm and an objective lens ( or mirror ) 114mm across. You often see telescopes measured in inches and it’s quite common to see 4 ½ inches, 6 inches, 8 inches in lists of telescopes, it may seem a bit old fashioned but there is a historic tradition. 114mm is about 4 ½ inches.
The magnification of a telescope is found by dividing the focal length of the telescope main tube by that of the selected eyepiece. For example, a 1000mm scope tube used with a 10mm eyepiece gives 1000/10 = 100x magnification. Used with a 5mm eyepiece, magnification would be 1000/5 = 200x
Most astronomical telescopes conform to standard eyepiece fittings which means there are a vast number of different eyepieces available giving a wide range of magnification options and these may also differ by design to give a wider field of view or longer eye relief ( more about eye relief later ).
An astronomical telescope is intended for looking at the night sky, Moon, planets, stars etc , whereas a spotting scope is for down to earth things, bird-watching, ships, long range observation etc. An astronomical scope can be used for normal observation and a spotting scope can be used to look at things in the night sky, but each is designed to perform best in the use it was intended. If you are only buying one telescope, In practice it’s easier to use a spotting scope for astronomical observation than it is to use an astronomical scope for normal observation.
Here are some of the considerations :-
Astronomical telescopes usually give inverted images, this doesn’t matter when you are viewing something in the night sky, but can be disconcerting when looking at a ship which appears upside-down. Eyepiece accessories can be obtained to erect the image though this can make the telescope a little clumsy to use. A spotting scope is designed to give erect, right way round images.
Astronomical telescopes are not usually designed with any degree of water resistance, after all you wouldn’t be using an astronomical telescope in the rain because the cloud means you wouldn’t see anything, but you might well be birdwatching in heavy rain.
One of the main differences is ability to interchange eyepieces. Most astronomical telescopes conform to standard eyepiece fittings which means there are a vast number of different eyepieces available. Spotting scopes tend to be supplied with modest magnifications and if they have interchangeable eyepieces the range available is more limited than for an astronomical telescope. This is done for good reason for most observation purpose 20x – 30x is more than sufficient, and magnifications much more than 60x are not really practical ( see the important notes later about magnification and brightness ).
Another big difference between an astronomical scope and a spotter is the type of tripod mount usually supplied with them. Spotting scopes usually have a standard tripod screw fitting allowing a normal ( camera type ) tripod to be used. The head movement here is side to side and up and down which is relatively quick and easy to use. When viewing the night sky however the movement of the earth has to be taken into account as this causes objects in the night sky to appear to move in an arc. Astronomical telescopes are usually designed for “equatorial” tripod mounts which is system of geared movement allowing the telescope to track the apparent movement of a body in the night sky. An equatorial mount can be used for normal observation too but it is less convenient and can take longer to find your subject.
Mirrors, lenses and prisms
Optical instruments use lenses and/or mirrors to produce magnification. Binoculars and spotting scopes tend to use lenses (and usually prisms too). Astronomical telescopes sometimes use lenses, called a REFRACTING TELESCOPE, or use mirrors (with lenses), called a REFLECTING TELESCOPE.
Refracting (lens) telescopes often give better contrast of image ( difference in tone between the light and dark parts of the image ) which can make the image easier to view than with a reflector. However telescopes with large lenses can be difficult and more expensive to manufacture than with large mirrors, and large lenses may change shape with time. The debate between astronomy enthusiasts of whether refractors and reflectors are best will no doubt continue. For most practical and affordable purposes we would suggest that astronomical refractors (lens) are good up to about 150mm to 200mm (6 to 8 inches) bigger than this a reflector may be better, and there are many quality compact reflectors made with 100mm – 150mm mirrors, particularly good if size is important.
Most binoculars and spotting scopes use prisms along with lenses to ‘fold’ the path of the light and make the instrument more compact. The common type being the porro prism design, named after its inventor, this uses two triangular faced prisms to provide an erect image. Another prism type is the roof ( or Dach ) prism, usually used to make more compact instrument designs.
Field of view (FOV)
This is how much of the object you can actually see. For a binocular or spotting scope It is usually measured in degrees or as an indication of width at a given distance. A common expression would be 100m/1000m. This means that viewing over a distance of 1000m (1km) you could see two objects 100m apart within the field of view of the binocular or telescope. 100m/1000m could be expressed as an angle, this is about 6 degrees. It may be written in yards, for example 100yards/1000yard which is just the same field of view as 100m/1000m. Confusingly some binoculars may show this in feet and yards, for example 300ft/1000yds, which is again the same as saying 100yds/1000yds, or 100m/1000m. These are just notation traditions. Astronomical telescopes usually indicate field of view by degrees or sometimes arc-minutes ( another convention of angle measuring ) though this is usually described for the selected eyepiece and the observed field of view has to be calculated, more about that soon.
A wide field of view is good because it makes viewing more comfortable and you don’t have to move the instrument so much to see objects across a wider area. Field of view is mainly related to magnification, bigger magnification usually means less angle of view. The design of the instrument can also have an effect on angle of view, hence there will be some variation from instrument to instrument at any given magnification.
Typically an 8x binocular would have an angle of view of between 5 degrees to 8 degrees. Anything less than 5 degrees for 8x would be considered a very narrow field, anything above 8 degrees is exceedingly wide. About 6.5 degrees would be average. For a 12x binocular, the field of view would likely vary between 4 degrees and 6 degrees, with around 5 being the average.
The field of view stated when you read product specification is usually that theoretically calculated from the optical design. the actual field of view in practice may differ slightly and will be reduced for example if you are wearing glasses and cannot get your eyes close enough to the eyepiece lenses ( see below for eye relief ).
For astronomical telescopes the field of view is usually given for the eyepiece and you have to calculate the true field of view for the combination of telescope and eyepiece. This is found quickly by dividing the stated field of view by magnification. For example you may select a 10mm eyepiece with a stated field of view of 50 degrees and use this with a 1000mm tube. The magnification is 1000/10 = 100x, the real field of view is 50/100 = 0.5 degrees.
Eye relief
This is the distance from the binocular or telescope eyepiece where you can comfortably view the full image. Typically many binoculars and scopes have eye relief of about 10mm-12mm and this is fine for viewers with normal eyesight. Spectacle users can usually roll back the rubber eyecups (some instruments now use twist eyecups) to get a little closer to the eyepiece lens but often this isn’t close enough to see a full clear image. Eye relief of 15mm-20mm would be better, and these can also be used with normal viewing too so long as the eyecups are a little longer, these then roll, or twist back to allow use with spectacles. The only downside of using a long eye relief instrument with normal vision is that setting the eyecup to the correct position may take a moment or two longer. Instruments with eye relief of about 15mm or more are often called long eye relief in their description or ‘LER’. Eye relief above about 25mm may be too long for normal use, the only exception may be a target scope for a rifle where you would want the scope some distance from your eye otherwise the recoil, when the gun is fired, may hurt ! Rifle scopes often have eye relief above 30mm.
More on eyepieces for Astronomical telescopes
Eyepieces for astronomical telescopes mostly conform to standard fittings. The main fitting is 31.7mm ( 1.25” ) most good quality telescopes use this and just about any eyepiece will fit and work with any scope. Other fittings in use are 0.98 inches, though this only tends to be used with very low price telescopes, and 2 inch which is used with very expensive instruments such as our Ostara F7 series. The use of a 2” fitting allows for wider eyepieces making wide angle viewing easier to achieve. As there are less 2 inch eyepieces available, this type of telescope can usually be easily adapted to work with 1.25 inch type eyepieces.
Brightness, Exit pupils, twilight factors, relative brightness … and more
How bright the image appears to be is an important consideration when selecting a binocular or telescope, a bright image makes viewing more comfortable and enjoyable..
At Optical Hardware we tend to talk about exit pupils when referring to the “brightness” of a binocular, we believe this is the most useful comparison for most practical purposes but it is not the whole story. If you’ve read information from various other sources, especially on the internet, you’ll probably have noticed there is a lot of confusing and sometimes contradicting information given. It is a complicated topic and open to various interpretation so I’ll try here to cut through this and give a simple, usable, overview.
Exit pupil is the size of the bright area (circle) seen on the eyepiece of a binocular or telescope, ( it is not the size of the eyepiece lens itself ) – the bigger, the better ( within limits )
The size of the exit pupil INCREASES as the objective lens size increases.
The size of the exit pupil DECREASES as the magnification increases
Exit pupil size is normally calculated by dividing the objective size by magnification, so a 10×50 binocular will have a (50/10=) 5mm exit pupil. An 8×40 will also have a (40/8=) 5mm exit pupil.
A 7×50 has a (50/7=)7mm (approx) and a 20×50 (50/20=) 2.5mm.
The human eye also has a pupil which opens and closes to control the amount of light entering the eye. The biggest this can typically open to in low light is about 7mm, closing down when it is bright.
In low light the human eye will be fully open at 7mm, so a binocular which is able to produce an exit pupil of 7mm will show a brighter image in low light, so a 7×50 or 8×56 etc perform incredibly well in low light.
There would be little point in having an exit pupil bigger than 7mm because the eye would not be able to use the extra light, so an 8×80 for example giving an exit pupil of (80/8=) 10mm is not a particularly efficient design. There is a school of thought which says that producing very large
( bigger than 7mm ) exit pupils can be an advantage because the eye is always comfortably looking into the bright exit pupil, even if the binocular is shaking. In practice however it makes little difference. 7mm is about the best the human eye can reach in low light, when it is brighter the eye closes down, in bright daylight this will perhaps be around 3mm, so for example a 10×30, exit pupil (30/10=) 3mm, will appear equally bright. The need for a 7mm exit pupil is only important in low light.
Furthermore 7mm is a ‘perfect’ eye which many of us haven’t got, and as we get older the ability of the eye to open reduces further, typically to around 5mm at best.
What this means in practice is that a 10×50 or 8×40 binocular ( exit pupil 5mm ) is great for most purposes. Use 7×50 or 8×56 if low light is really important and you have very good vision. If your requirement is normal daylight observation then most binoculars of modest magnification will work very well.
Please also be aware that some optical designs can act to reduce the effective objective size slightly. This is usually done to improve some other aspect of the design but can reduce the exit pupil size slightly and so reduce its effectiveness in low light. The “stop-down” effect on most binoculars of this type is small – no more than 3 to 5mm on the ojective lens size.
When divided by magnification, it makes little difference to binoculars with 40mm or larger lenses, especially when considering the practicalities of not perfect human eyes.
You can measure the actual exit pupil size by holding the binoculars away from your eyes and (carefully) placing a measure alongside the bright circle.
Relative Brightness is another term used by some. This is the calculated by squaring the exit pupil. So a 10×50, exit pupil 5mm, has a relative brightness of 25. A 10×30 (3mm) has a relative brightness of 9.
Twilight factor is a common term for comparing binoculars in low light conditions but is often misused. Twilight factor is found by multiplying the size of the objective lens in mm by the magnification and then taking the square root. So a 10×50 has a twilight factor of (approx square root of 500=) 22. An 8×40 would have a twilight factor of (approx square root of 320=) 18, and a 20×80 has a TF of 40. This implies that increasing either magnification, or increasing objective lens size, or both, will make the binocular perform better in low light. This is true, to a point, as both increased magnification and increased objective size can improve effectiveness of observation in low light conditions especially when considering large objective binoculars and astronomical telescopes. There is also an argument that in falling light, when the eye may not be fully dark adapted, increased magnification can improve viewing. But effectiveness of observation and a comfortable bright image are not the same. Twilight factor implies that a 10×50 and a 50×10 would be equally good in low light, I can be reasonably sure that you would not find this to be the case ! ( and no one, as far as I know, makes a 50×10 )
Always, in practice, modest magnification and a reasonably large objective size ( within the size and weight limits that you are happy to carry ) is the best choice for general purpose binoculars and scopes.
The situation is slightly different when considering large objective scopes and observation binoculars and astronomical telescopes used for looking at very dim subjects where both increasing magnification and objective lens, or mirror, size is useful. Bigger objectives mean better resolution and light gathering, increasing magnification shows detail however this only works within practical limits. For an astronomical telescope when viewing dim deep sky objects, a rough guide would be a maximum magnification of about twice the size of the objective, so for an 80mm scope, maximum usable magnification would be about 160x, a 200mm scope would be 400x. You do not require the really high magnifications for all objects, it depends on what you are looking at. Astronomy publications give suggestions for best magnification but actually there is no substitute for the enjoyment of finding out yourself by trail and error. Remember, the magnification of an astronomical scope is determined by your choice of eyepiece (see earlier discussion) so you would select an appropriate eyepiece to give the required magnification. Many scopes are supplied with a number of eyepieces and additional ones are available at modest cost.
Even with scopes of 200mm or larger, which would imply that you could work with magnifications of over 400x, the maximum practical magnification, no matter how big the scope, is around 300x-400x. Beyond this atmospheric distortions becomes a more important factor and if the scope isn’t on a stable tracking mount, maximum magnification is further limited by vibration.
Quality of optics
All of the above discussions about magnification and light gathering and all other considerations assume that you are comparing like for like. Exit pupil, relative brightness, twilight factor etc, tell you that all 8×42’s are the same, in fact the optical quality of the instrument, the materials used and careful construction and alignment can make a huge difference to image resolution and brightness. When selecting a binocular or telescope there is no substitute for trying it, and if possible, in the conditions and environment where you plan to use it.
Clear skies and good seeing
Another major consideration which, especially for astronomy, can be very important is the clearness of sky. Dust and dirt pollution reduces the ability to view clearly, ambient light is also a significant. For best viewing you need a clear night away from town and city lights and even then there are more problems to deal with. What appears to be a perfectly clear sky can have air disturbances caused by wind, temperature differentials and other factors. There’s no easy answer, getting on high ground reduces the amount of atmosphere you have to look through and can help but for the most part astronomy requires a degree of patience, but with that comes much fun and enjoyment.
Digiscoping
This is the science ( or art ? ) of coupling a camera, usually digital these days but most of the considerations also apply to film SLRS’s, to a telescope to achieve high magnification photography. Essentially there are two ways to do this. You can attach a digital or film SLR camera directly to a scope without the scopes eyepiece in place, this usually requires a camera adaptor on the scope and a T2 mount to match the camera. This is called the Prime Focus method. It has the advantages of (theoretically) better quality because it minimises the number of glass elements the light has to travel through and gives short shutter capture speeds however it is only usable with scopes with removable eyepieces and SLR cameras. The other method is “AFOCAL” – this is where the telescope with eyepiece attached is used with a camera with lens attached and is mounted close to the telescope eyepiece. This method is really only suitable for digital compact cameras where there is a viewing screen. It’s better if the camera has a filter thread around the lens as this allows for easier and more accurate coupling and alignment but it’s not essential as most telescopes have a variety of camera adaptors and brackets available. There are many considerations in achieving good photographs, we cover many of these in the digiscoping section of the Optical Hardware website and there are many other good resources.